
[모션5]한 눈에 살펴보는 애플 모션5 인터페이스
한 눈에 살펴보는 애플 모션5 인터페이스
Motion interface at a glance
모션5의 인터페이스는 몇몇 기능적인 영역으로 나누어 볼 수 있습니다. The Motion interface is divided into several functional areas.
프로젝트 브라우저 Project Browser
처음 모션5를 실행시키면 프로젝트 브라우저가 등장합니다. 이 프로젝트 브라우저를 통해서 여러분은 새로운 작업을 시작할 수도 있고 이미 작업을 한 프로젝트를 열어볼 수 있겠죠. When you open Motion, the Project Browser appears. Use this window to create new projects or open existing projects.

메인 작업 공간 Main workspace
프로젝트 브라우저에서 프로젝트 열기를 선택하셨다면 아래 그림과 같은 메인 작업 공간이 등장합니다. 여러분이 모션 그래픽 작업을 위해 무엇인가를 만들고, 수정하고, 또 미리보기 위해서 이 작업공간을 사용하셔야 합니다. 아래 그림과 같이 메인 작업 공간은 몇몇 기능적인 영역으로 나누어 볼 수 있습니다. 그럼 지금부터 하나하나씩 살펴보도록 할까요? After you open a project via the Project Browser, the main workspace appears. Use this window to build, modify, and preview your motion graphics projects. The main workspace is divided into several functional areas, described in detail below.
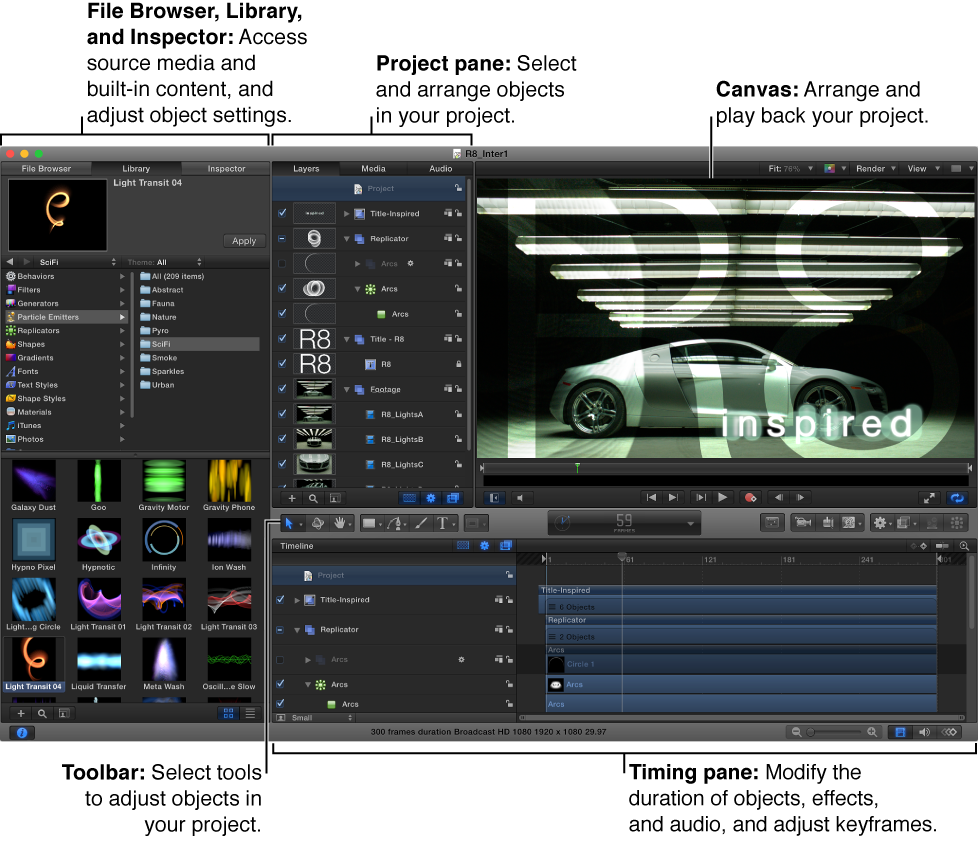
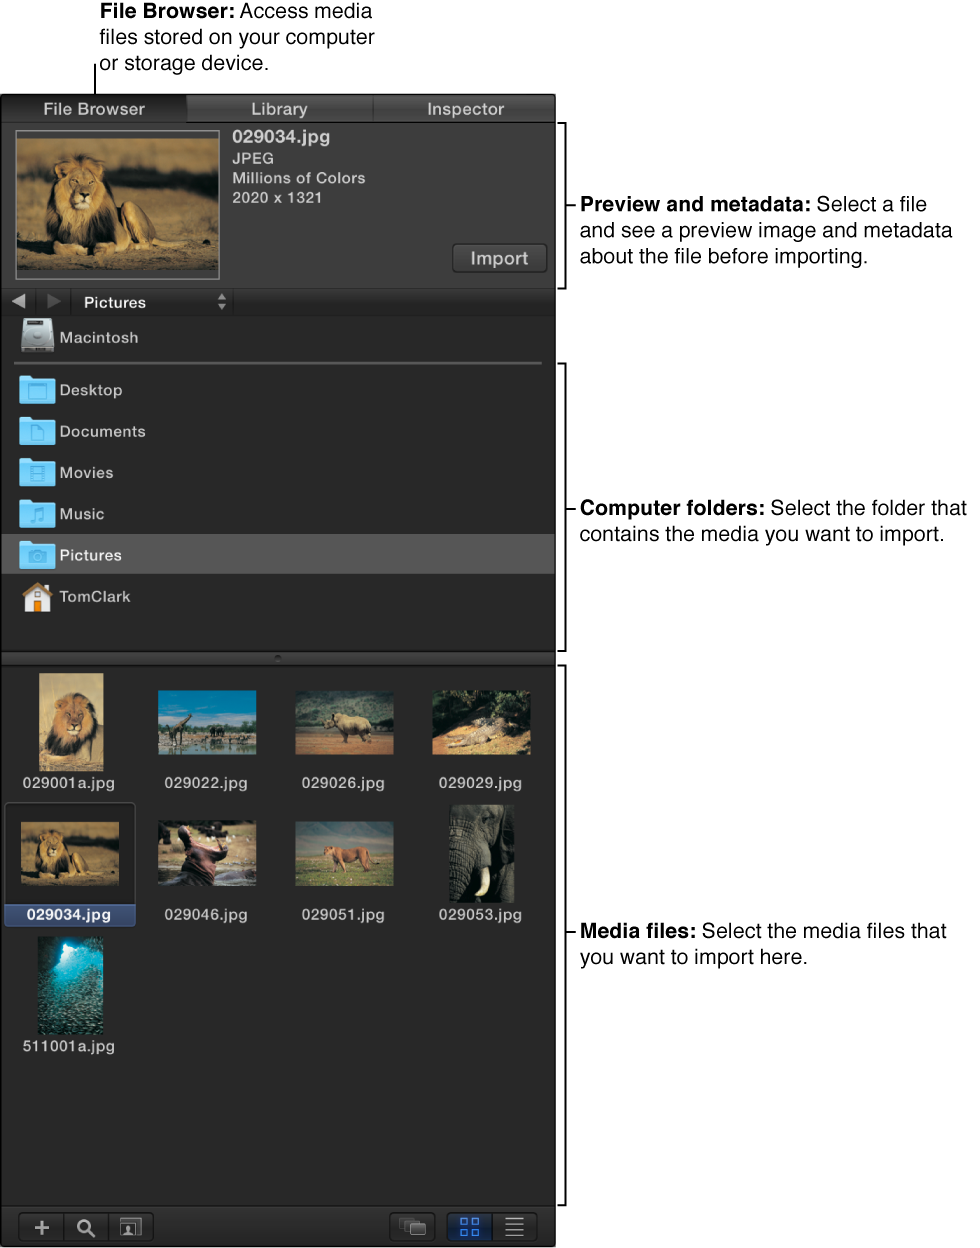
파일 브라우저 File Browser
메인 작업 공간 맨 왼쪽에는 파일 브라우저가 위치해 있습니다. 이 곳에서는 여러분의 컴퓨터와 네트워크로 연결된 드라이브에 저장된 모든 파일을 볼 수 있습니다. 파일 브라우저는 윈도우즈로 치면 탐색기, 맥으로 치면 파인더의 역할을 합니다. The File Browser, located on the left side of the main workspace, displays all files on your computer and networked disks. Navigating the File Browser is similar to navigating a window in the Finder.
파일브라우저에 하나의 파일을 선택하시면 왼쪽 상단에 파일의 미리보기가 나타나고 오른쪽에는 파일의 메타 정보가 뜹니다. When you select a file in the File Browser, a visual preview appears in the top-left corner of the Motion workspace, along with the file’s metadata.
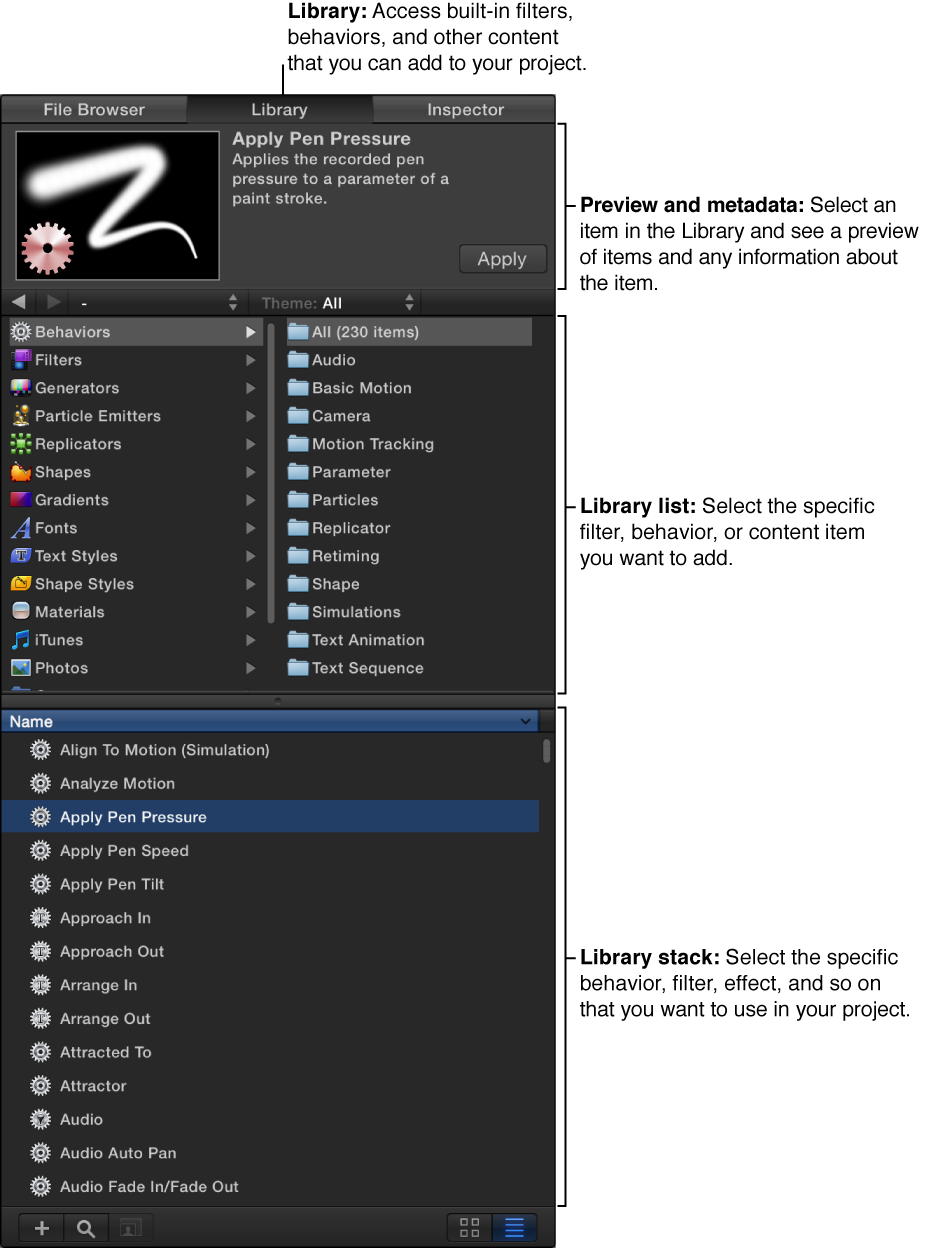
라이브러리 Library
메인 작업공간 왼쪽 사이드에 위치하고 있는 라이브러리는 이펙트, 컨텐츠, 프리셋, 비헤이버, 필터, 그리고 모션에서 바로 활용가능할 수 있는 여러 가지 소스들을 포함하고 있습니다. 여러분 입맛대로 폰트, 음악, 사진을 추가할 수 있으며 모션에서 작업한 이펙트와 소스를 저장할 수도 있습니다. The Library, located on the left side of the main workspace, contains effects, content, presets, behaviors, filters, and other elements available in Motion. You can expand the Library content by adding fonts, music, or photos, or by saving content and effects that you create in Motion.
아까 파일브라우저처럼 라이브러리에서도 파일을 하나 선택하면 상단 왼쪽에 미리보기가 지원이 됩니다. 그 옆에는 정보도 같이 뜹니다. 이걸 보고 어떤 비헤이버, 필터, 제네레이터 인줄 알 수 있죠. When you select an item in the Library, a visual preview appears in the top-left corner of the Motion workspace. The preview area also contains text information for the selected item, such as a description of the behavior, filter, or generator.
인스펙터 Inspector
모션 작업에서 여러분이 이미지나 비디오 클립, 혹은 이펙트를 선택하게 되면 각각의 값들을 조절할 수 있는 곳이 바로 인스펙터 입니다. When you select an object in your Motion project—an image, video clip, or effect—its parameter controls become available in the Inspector, located on the left side of the main workspace, ready for adjustment.
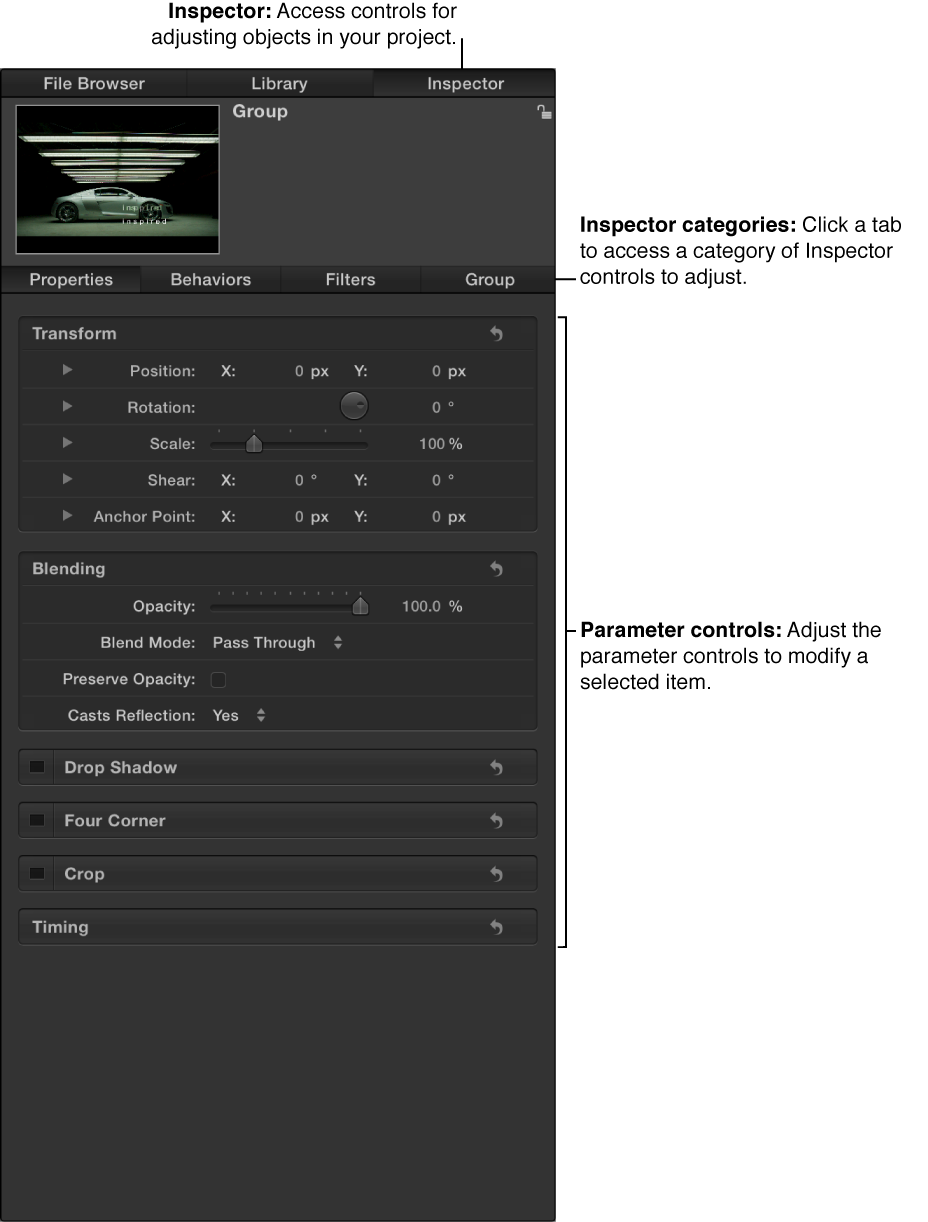
인스펙터는 4가지의 범주가 있는데 각각의 파라미터를 조절할 수 있는 부분이 있습니다. There are four Inspector categories, each of which displays parameter controls for the selected object:
-
Properties(성질, 특징) Inspector: 기본적인 속성을 조절할 수 있습니다. 포지션, 스케일, 블렌딩 옵션 등을 건드릴 수 있지요. Contains controls for setting basic attributes of the selected object, such as position, scale, and blending.
-
Behaviors (동작) Inspector: 동작들의 속성을 수정할 수 있습니다. 여러분의 프로젝트에서 적용하고자 하는 애니메이션과 시뮬레이션을 조절할 수 있지요. Contains controls for adjusting attributes of behaviors—animation and simulation effects that you can apply to objects in your project.
-
Filters(필터) Inspector: 필터와 관련한 부분을 수정할 수 있습니다. Contains controls for adjusting attributes of filters—visual treatments that you can apply to objects in your project.
-
Object (오브젝트) Inspector: 선택된 객체의 유형에 따라 다양한 컨트롤들을 포함합니다. 카메라, 텍스트, 또는 모양(shape)으로 상황에 맞는 컨트롤을 할 수 있습니다. Contains controls that vary depending on the type of object selected. The name of this Inspector is also context-sensitive, changing depending on the type of object selected, such as Camera, Text, or Shape.
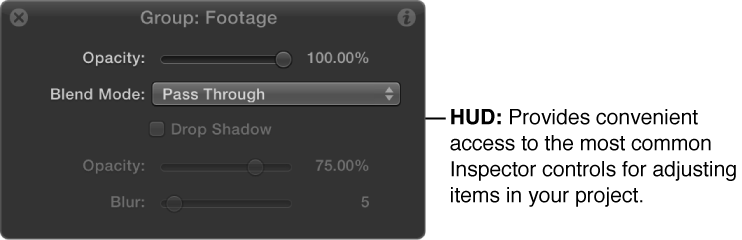
헤드 업 디스플레이 Heads-up display (HUD)
애플 모션만의 특징적인 부분입니다. 자주 쓰이는 인스펙터 콘트롤을 별도의 팝업창을 통해 조절할 수 있습니다. (이 HUD를 통해 조절할 수 있는 값이 다소 제한이 있기 때문에 그 이상의 값들을 조절하기 위해서는 인스펙터에서 조절하셔야 합니다) The most commonly used Inspector controls are also available in the heads-up display (HUD), a floating window that you can show or hide. For more information, see Transform layers in the HUD.
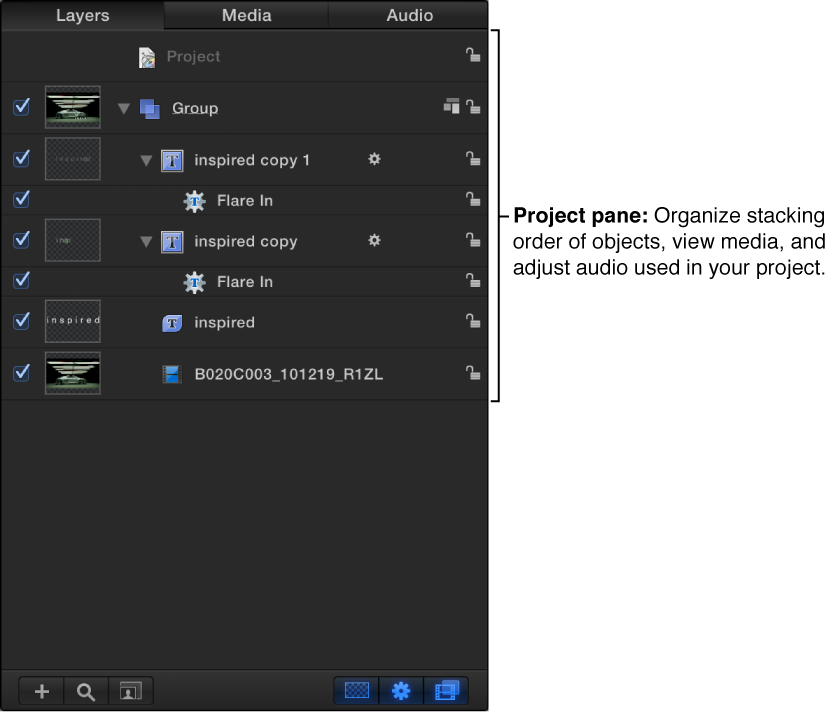
프로젝트 패널 Project pane
프로젝트 패널 (파일브라우저,라이브러리, 인스펙터 와 캔버스 중간에 끼워져 있습니다, 새우 아닙니다)은 세 개의 리스트를 포함하고 있습니다 (레이어, 미디어, 오디오) 분류가 되어 있어서 작업할 때 편리함을 줍니다. The Project pane (located between the File Browser, Library, or Inspector and the Canvas) contains three lists, each of which provides access to a different aspect of your project:
-
레이어 리스트 Layers list: 오브젝트(그룹, 레이어들, 카메라, 조명, 비헤이버, 필터, 그리고 기타 등등)를 계층별로 보여줍니다. Displays the hierarchy of objects (groups, layers, cameras, lights, behaviors, filters, and so on) in your project.
-
미디어 리스트 Media list: 작업을 위해 불러온 파일들을 보여줍니다.Shows the files imported into your project.
-
오디오 리스트 Audio list: 프로젝트에서 오디오파일(수정 가능한) 을 보여줍니다. Provides access to, and control of, audio files in your project.
프로젝트 패널에 레이어들은 단순히 목록만 나열하는 것이 아닙니다. 레이어가 쌓여져 있는 순서에 따라 화면에 보여지기도 하고 숨겨지기도 합니다. 이미지 레이어, 오디오 세팅, 그리고 소스 미디어 세팅을 포함한 모션 그래픽 구성에 핵심적인 속성을 구현할 수 있습니다. More than simple lists of items in a project, these panes let you organize key attributes of a motion graphics composition, including the stacking order of image layers, audio settings, and source media settings.
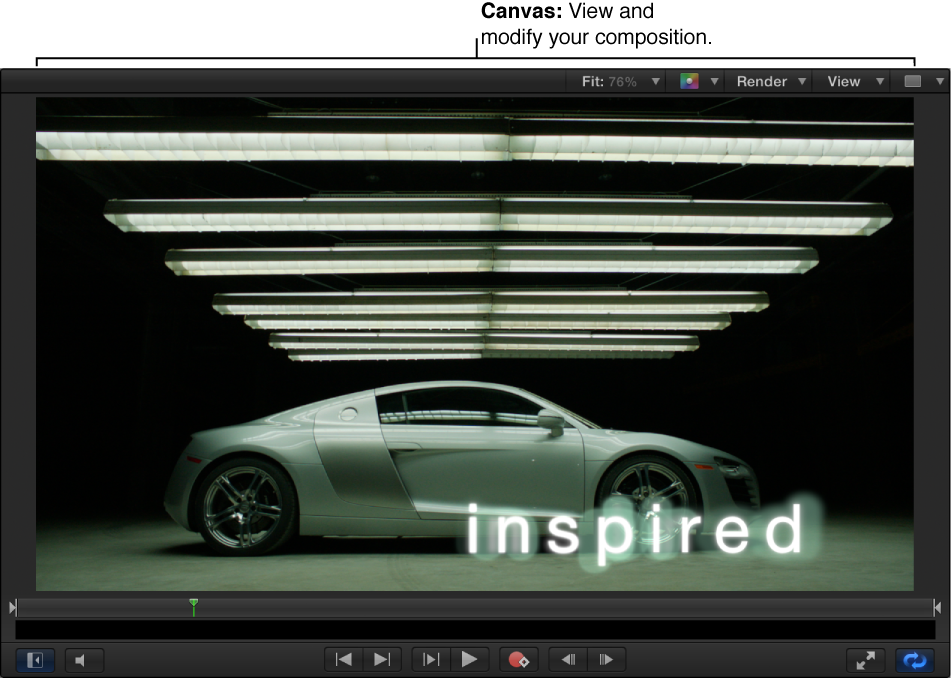
캔버스 Canvas
캔버스는 시각적인 작업 공간입니다. 작업을 하시면서 오브젝트를 수정하거나 재배열 할 때 많이 사용되죠. 라이브러리나 파일브라우저에서 추가하고 싶은 레이어나 이펙트를 캔버스에 드래그해서 끌어주면 적용이 됩니다. 작업한 영상을 외부로 공유하고자 할 때 캔버스는 보여지는 바를 보여주지요. The Canvas is the visual workspace where you modify and arrange objects in your composition. Adding layers and effects to your project is as simple as dragging them from the Library or File Browser to the Canvas. The composition in the Canvas is what will be output when you share a project.
캔버스 아래쪽 중앙에 위치한 버튼들은 트랜스포트 콘트롤 입니다. 프로젝트를 재생하고자 할 때 이 버튼들을 눌러보세요. The group of buttons centered at the bottom of the Canvas are transport controls. Use these buttons to play your project and see how it looks over time.
툴 바 Toolbar
오브젝트를 수정하거나 만들고자 할 때 툴 바를 이용할 수 있습니다. 툴바는 대부분 모션 작업 창의 중앙에 위치해 있습니다. 2D나 3D 공간에서 오브젝트를 이동하는 명령을 줄 때나 글자, 모양, 마스크를 만들 수도 있고, 카메라를 추가하거나 조명, 제네레이터, 파티클 시스템 그리고 리플리케이터까지 포함하고 있습니다. You can access tools for editing and creating objects in the toolbar, located in the center of the Motion workspace. There are tools that transform objects in 2D or 3D space; tools that create text, shapes, and masks; buttons that add cameras, lights, generators, particle systems, and replicators; and pop-up menus that apply filters and behaviors to objects.

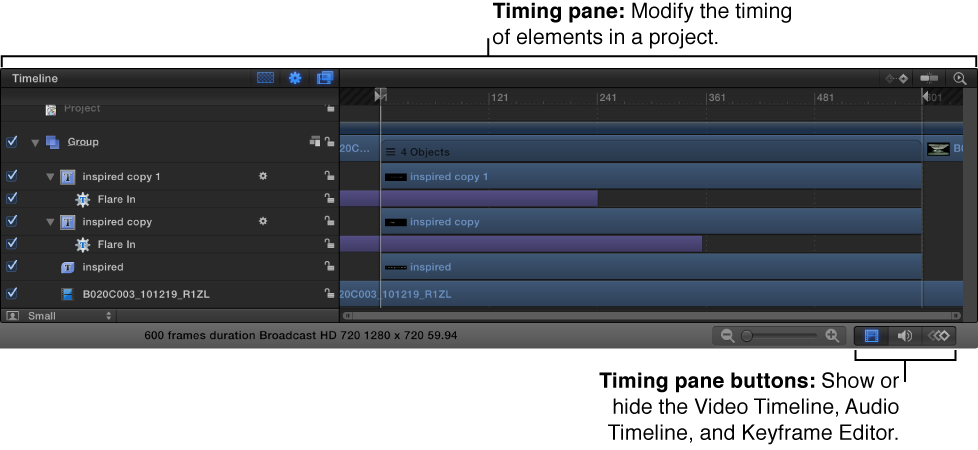
타임 패널 Timing pane
타임 패널은 모션 작업 창의 하단에 위치해 있습니다. 프로젝트 컨텐츠들을 보거나 수정하고자 할 때 사용합니다. The Timing pane, located at the bottom of the Motion workspace, lets you view and modify the time component of a project’s contents. There are three panes that control a different timing aspect of a project:
-
비디오 타임라인 Video Timeline: 네, 비디오를 미리 볼 수 있죠. Provides an overview of objects in the project and how they’re laid out over time.
-
오디오 타임라인 Audio Timeline: 네, 오디오도 들을 수 있죠. 수정도 가능해요. Provides an overview of audio components in the project and how they are laid out over time.
-
키프레임 에디어 Keyframe Editor: 애니메이션 속도나 파라미터를 조절할 때 사용해요. Displays the animation curves for animated parameters and effects.
'애플 모션5 Motion > 애플 모션5 팁 모음' 카테고리의 다른 글
| [모션5]비디오 월 효과로 연출해본 2015년 영상들 (0) | 2015.10.11 |
|---|---|
| [모션5]아이폰의 슬로모션 영상을 모션5에서 역동적으로 연출해보기 (0) | 2015.10.07 |
| [모션5]burst 효과(불꽃놀이) 간단하게 연출하기 (0) | 2015.09.13 |
| [모션5]프로젝트 생성 및 관리 살펴보기 (0) | 2015.07.08 |
| [모션5]모션의 작업흐름도 (0) | 2015.06.26 |
| [모션5]모션은 어떤 프로그램인가? (0) | 2015.06.25 |
| [모션5]애플 모션5의 장단점 (개인적인 생각) (0) | 2015.06.15 |
| [모션5]내가 좋아하는 텍스트 이펙트 blur in, blur out, 그리고 스케일 키우기 - 김동률의 청춘 모션 타이포를 중심으로 (5) | 2015.02.27 |


댓글